
What is Azure DevOps?
Azure DevOps Server is a Microsoft product that provides version control, reporting, requirements management, project management, automated builds, testing and release management capabilities. It covers the entire application lifecycle, and enables DevOps capabilities. In this blog post we are going to discuss how to manage our code via Azure DevOps source control using Git Commands.
Tools Required
- Windows Machine with Windows 10 and Above Installed.
- Git Command Line Installed( Follow the link to learn more)
- Sign up for Azure DevOps
Once you signup for Azure DevOps or you already had an account, with successful login you should get the below landing page.

The newly created project will appear as below

The procedure below is followed when you need to load the source code to Azure DevOps for the first time
- Proceed to the repos option of the project and initialize it with a README and gitignore File.
- Clone the project to a specified folder on your local Windows machine.
- Add the necessary Files to the cloned directory
- Run the command to check the git tracking status of the changes. This should show you the changes that haven’t been backed up as those you recently added to the cloned directory.
- Run the git add command to add the changes to source control
- Run the commit command to update the changes to source control
- Run the push command to make the changes live on Azure DevOps
The commands are as below:
- git clone <remote url>
- git init
- git add .
- git commit -m “XamarinLeads Inital Load”
- git push -u origin master
Visual Step by Step Procedure
Start by cloning the project created in Azure DevOps using the HTTPS option
Copy the clone url as shown in the below images then right click on the local folder where you need the cloned project to be saved.


Select the Git Bash here option as highlighted above to get the dialog window as shown

Run the git clone command as below
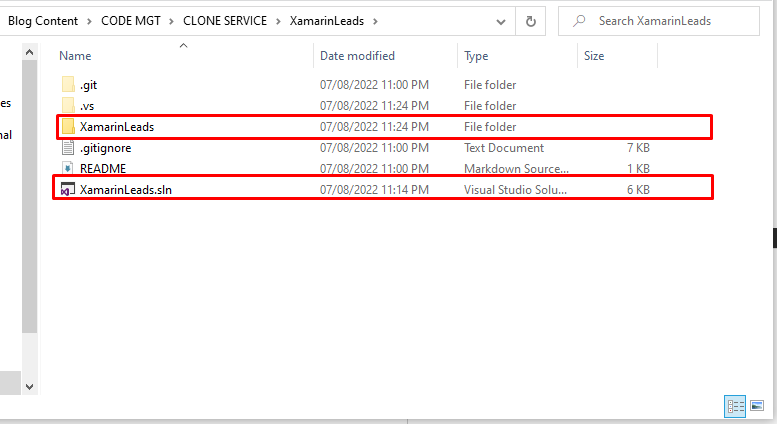
git clone https://[Your Azure DevOps domain].visualstudio.com/XamarinLeads/_git/XamarinLeadsOnce the cloning is done the local folder should have details as below

Create a new Xamarin project in Visual Studio 2019. The project is a sample Xamarin Flyout Project (You can choose any of your choice)


Copy the created Files of the project to the cloned source control folder as shown
If you don’t have a project that you can use, please follow the procedure to create a sample ASP.NET MVC Project
The folder has already been initialized for git tracking hence will skip the command for git Initialization. The command is used to convert an existing, un-versioned project to a Git repository or initialize a new, empty repository.
We get a response that it has reinitialized the git repository even though it was already initialized with the presence of the git folder which holds

At this stage we are ready to push our code to Azure DevOps and will be doing so on the main branch as indicated in the screenshot above
The following command should be used in the order stated, then confirm that the code has been successfully loaded to Azure DevOps
git status
git add .
git commit -m "XamarinLeads Inital Load"
git push
With that done you should be able to see the below under Repos on Azure DevOps on successful refresh of the page


Pingback: ASP.NET MVC With jQuery Ajax CRUD Operations Using JSON Without EF - Developer Crucible
Very informative
Thank you